We've seen how to install ROS in Windows 10 in this article, this is the time to start programming. What is the very first thing we do once we setup a new Programming Language?
Hello World !!!
Lets see how to write Hello World in ROS on Windows machine.
Before going into the programming, make sure you've installed Gedit on your Windows machine. You can get it from here. Also, setup the path for Gedit and restart your machine to ensure the path definition works.
First open the ROS terminal and check for the working directory.

We have to be in the catkin workspace. If you've already created it, go to that directory. Or else, create it like this.
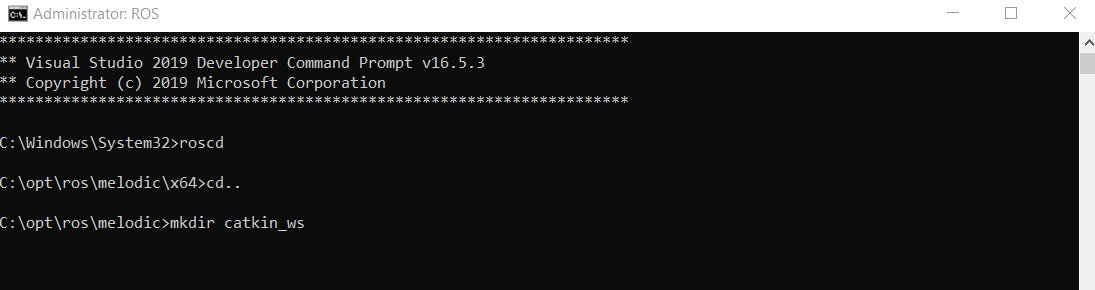
Create a src folder inside catkin_ws. Inside that newly created src folder, lets create a new package in it. The command to create a ROS package is as follows.
>catkin_create_pkg [PACKAGE_NAME] [DEPENDENT_PACKAGE_1] ....[DEPENDENT_PACKAGE_N]

‘std_msgs’ and ‘roscpp’ were added as optional dependent packages in the previous command. This means that the ‘std_msgs’, which is a standard message package of ROS, and the ‘roscpp’, which is a client library necessary to use C/C++ in ROS, must be installed prior to the creation of the package. These dependent package settings can be specified when creating the package, but can also be created directly in ‘package.xml’.
You can see what are the files have been created inside hello_world_pkg using Windows CMD command.

‘Package.xml’, which is one of the essential ROS configuration files, is an XML file containing information about the package, including the package name, author, license, and dependent packages. You can open it in an editor and see the default facts in the file.
Below are descriptions of each statement.
I've modified the package configuration file (package.xml) as follows. You can also do it in your own in your environment. If you are unfamiliar with it, you can use the below file to edit simply.
The following is the modified build configuration file (CMakeLists.txt). Use it as it is if you are following from the top.
This example uses the gedit editor, but you can use your preferred editor, such as vi, gedit, qtcreator, vim, or emacs.

Open another terminal and execute catkin_make in catkin workspace like this after executing rosack profile (this is otional).

catkin_make must be executed without an error and must end like this.

Now, open a new terminal and execute roscore.

Now you have to execute the written program.

If you get this error, you need to do one thing before rosrun.

Now, execute the rosrun.

We have done hello_world program using ROS in Windows successfully.
Source code can be found at (https://github.com/iamnickson/ros_tutorials_hello_world.git)
Hello World !!!
Lets see how to write Hello World in ROS on Windows machine.
Before going into the programming, make sure you've installed Gedit on your Windows machine. You can get it from here. Also, setup the path for Gedit and restart your machine to ensure the path definition works.
First open the ROS terminal and check for the working directory.
We have to be in the catkin workspace. If you've already created it, go to that directory. Or else, create it like this.
Create a src folder inside catkin_ws. Inside that newly created src folder, lets create a new package in it. The command to create a ROS package is as follows.
>catkin_create_pkg [PACKAGE_NAME] [DEPENDENT_PACKAGE_1] ....[DEPENDENT_PACKAGE_N]
‘std_msgs’ and ‘roscpp’ were added as optional dependent packages in the previous command. This means that the ‘std_msgs’, which is a standard message package of ROS, and the ‘roscpp’, which is a client library necessary to use C/C++ in ROS, must be installed prior to the creation of the package. These dependent package settings can be specified when creating the package, but can also be created directly in ‘package.xml’.
You can see what are the files have been created inside hello_world_pkg using Windows CMD command.
‘Package.xml’, which is one of the essential ROS configuration files, is an XML file containing information about the package, including the package name, author, license, and dependent packages. You can open it in an editor and see the default facts in the file.
Below are descriptions of each statement.
- <?xml> This tag indicates that the contents in the document abide by the XML Version 1.0.
- <package> This tag is paired with </package> tag to indicate the configuration part of the ROS package configuration part.
- <name> This tag indicates the package name. The package name entered when creating the package is used. The name of the package can be changed by the developer.
- <version> This tag indicates the package version. The developer can assign the version of the package.
- <description> A short description of the package. Usually 2-3 sentences.
- <maintainer> The name and e-mail address of the package administrator.
- <license> This tag indicates the license, such as BSD, MIT, Apache, GPLv3, LGPLv3.
- <url> This tag indicates address of the webpage describing the package, or bug management, repository, etc. Depending on the type, you can assign it as a website, bugtracker, or repository.
- <author> The name and email address of the developer who participated in the package development. If multiple developers were involved, append multiple <author> tags to the following lines.
- <buildtool_depend> Describes the dependencies of the build system. As we are using the Catkin build system, write ‘catkin’.
- <build_depend> Dependent package name when building the package.
- <run_depend> Dependent package name when running the package.
- <test_depend> Dependent package name when testing the package.
- <export> It is used when using a tag name that is not specified in ROS. The most widely used case is for metapackages. In this case, use <export> <metapackage/></export> to notify that the package is a metapackage.
- <metapackage> The official tag used within the export tag that declares the current package as a metapackage.
I've modified the package configuration file (package.xml) as follows. You can also do it in your own in your environment. If you are unfamiliar with it, you can use the below file to edit simply.
<?xml version="1.0"?>Catkin, the build system for ROS, uses CMake and describes the build environment in the ‘CMakeLists.txt’ in the package folder. It configures the executable file creation, dependency package priority build, link creation, and so on. You can open it in an editor and see the default facts in the file. Lets see about its contents in a separate article. For now, just follow the flow.
<package>
<name>my_first_ros_pkg</name>
<version>0.0.1</version>
<description>The my_first_ros_pkg package</description>
<license>Apache License 2.0</license>
<author email="himnickson@gmail.com">Nickson</author>
<maintainer email="himnickson@gmail.com">Nickson</maintainer>
<url type="repository">https://github.com/iamnickson/robotics_tutorial.git</url>
<buildtool_depend>catkin</buildtool_depend>
<build_depend>std_msgs</build_depend>
<build_depend>roscpp</build_depend>
<run_depend>std_msgs</run_depend>
<run_depend>roscpp</run_depend>
<export></export>
</package>
The following is the modified build configuration file (CMakeLists.txt). Use it as it is if you are following from the top.
cmake_minimum_required(VERSION 2.8.3)The following setting is configured in the executable file creation section (add_executable) of the ‘CMakeLists.txt’ file mentioned above.
project(my_first_ros_pkg)
find_package(catkin REQUIRED COMPONENTS roscpp std_msgs)
catkin_package(CATKIN_DEPENDS roscpp std_msgs)
include_directories(${catkin_INCLUDE_DIRS})
add_executable(hello_world_node src/hello_world_node.cpp)
target_link_libraries(hello_world_node ${catkin_LIBRARIES})
add_executable(hello_world_node src/hello_world_node.cpp)This is the setting to create the executable ‘hello_world_node’ by referring to the ‘hello_ world_node’ source code in the ‘src’ folder of the package. As ‘hello_world_node.cpp’ source code has to be manually created and written by developer, let’s write a simple example. First, move to the source code folder (src) in your package folder by using ‘cd’ command and create the ‘hello_world_node.cpp’ file as shown below.
This example uses the gedit editor, but you can use your preferred editor, such as vi, gedit, qtcreator, vim, or emacs.
Now, you must see a new blank gedit file. Use the following C++ codes there and save it.

Open another terminal and execute catkin_make in catkin workspace like this after executing rosack profile (this is otional).
catkin_make must be executed without an error and must end like this.
Now, open a new terminal and execute roscore.
Now you have to execute the written program.
If you get this error, you need to do one thing before rosrun.
Now, execute the rosrun.
We have done hello_world program using ROS in Windows successfully.
Source code can be found at (https://github.com/iamnickson/ros_tutorials_hello_world.git)
Comments
Post a Comment